Showing posts with label craft. Show all posts

Saturday, June 8, 2013

The Modern Day Leaf

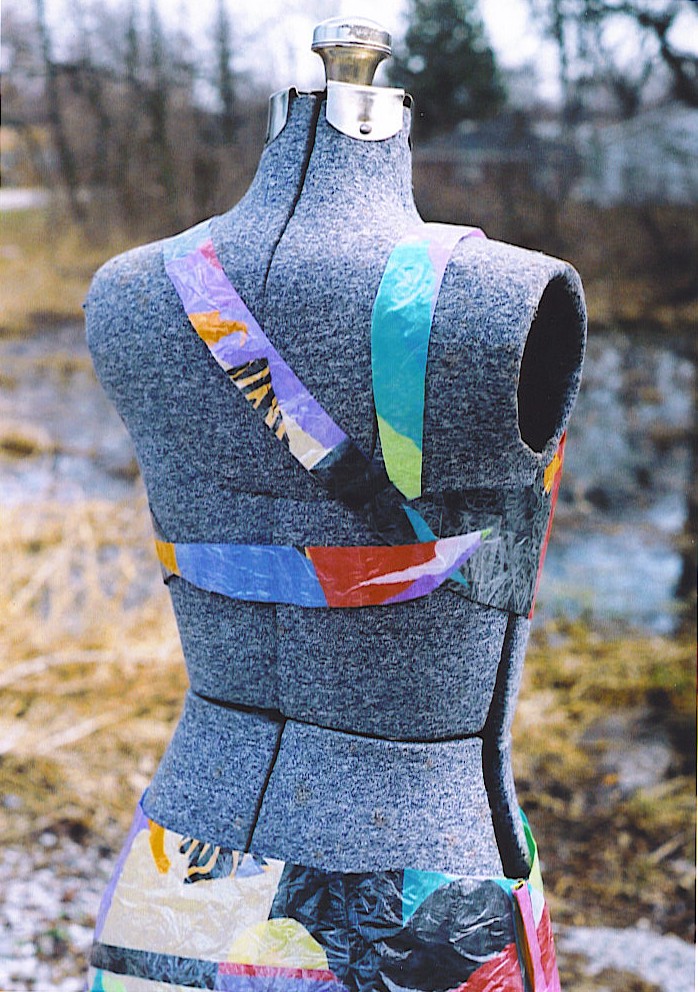
Back when I was in high school, I decided my final GT Art project would be a dress made of soda pop bottles. I spent the entire semester saving up supplies and the whole school donated. I called it "The Modern Day Leaf." It was a statement about how we cover ourselves. Adam and Eve covered themselves with leaves, to cover their sins. One day, if we don't care care of our world, all we will have to cover ourselves is our trash.

I went on to make a few more recycled "couture" pieces- a dress made from packing material and office supplies, a bra/skirt set made from packing tape and discarded gift tissue, and another from food packaging.

 I decided to pay a little visit to memory lane and share these old images with you. I hope you enjoy them!


Thursday, February 21, 2013

How to Be a Super Mom: Part 3: Growing, Growing, Grown!

The following is the second in a guest post series by Krystal Taylor my good friend and “Super Mom” of three...

A few months after her second and third children were born (surprise, twins!), her husband got laid off so she had to go back to work. Here are a few of the life saving tips that she uses to balance work and home life.


Growing, Growing, Grown :-(

Somewhere along the line of being a parent I started to become crafty. I also realized by me being crafty, I could save money and have something fun to do. I decided one say that I wanted growth charts for my kids. Well, we got paper ones and they were ripped down the first week. I need something more durable. I looked on Etsy.com but to buy three I was going to pay close to $300.00! So I made my own! I
1.        I purchased three pieces of wood from a local hardware store
2.       Then purchased about 10 samples of paint (the small containers at the store with the paint samples, that’s all I needed) its latex paint I paid about $2.75 per container. If you don’t want to buy paint, you could also use leftover paint from painting your house.
3.       Then I went to town! Painted whatever I wanted! The kids love them and so do I! We measure every six months! I can keep these forever and I only spent about $10.00-15.00 per chart  : )
That’s a savings of over $255!
Tips:
-          Don’t forget when adding the inches on the side to start at two feet. Then hang it two feet off of the ground.
-          I also take pictures every time we measure. I keep a zip lock bag on the back and put the dates on each picture. It’s fun to see how much they grow in just six months!!!

Krystal's Other Guest Posts:

How To Set Up A "House Account" Guest post by Krystal Taylor 

Looking for some more money saving How-To's? Check these out:

How to Peel Fruit to Save Citrus Rind

How to Make Cheap Fruit Cleaner

Want to hear more from Krystal? Look out for the next installment of her guest posts and check out her blog at: Quest Of A Crazy Mom!

Subscribe to Saving With Selena

Saturday, February 9, 2013

You Will Never Look At A Toilet Paper Roll The Same Way Again


Beleive it or not, although there is a snow storm in the North, it is almost seed starting time here in the South. This life hack got me looking for more ways to recycle and reuse toilet paper rolls. I didn't realize there were so many ways to reuse something I tend to toss!

As a seed starter... 
 

Impromptu iPhone holder...

 For organizing cords...
 

For keeping wrapping paper from unrolling...

For wrapping small presents... 

Toilet paper roll gift boxes
Source: http://factorydirectcraft.com/factorydirectcraft_blog/upcycling-toilet-tube-gift-box/


Add fabric for a jewelry tray...
toilet paper jewelry box
Source: http://blah-to-tada.blogspot.com/2012/04/jewelry-tray.html
For the birds...
Source: http://fortytworoads.blogspot.com/2012_02_01_archive.html

To manage bathroom appliance cords... 

Source: http://www.lifehacker.com.au/2010/05/from-the-tips-box-security-questions-bathroom-cords/

Fun for  your little pets...

Image source: http://www.sciencedaily.com/releases/2009/03/090305171903.htm (Credit: Image courtesy of University of Texas Health Science Center at San Antonio)

For Teh lulz...

Glove Gun - 4 Teh Lulz
Source:

http://www.yousaytoo.com/glove-gun-4-teh-lulz/2804068

Now that we've looked at the practical, what about the beautiful?

 Yuken Teruya has some very beautiful paper craft works of art...

Source: http://www.yukenteruyastudio.com/projects via http://senseandgrace.com/?p=2429

So does Anastasia Elias...

Ballet
Source: http://www.anastassia-elias.com/view-album/10

What about mini masks by Junior Fritz Jacquet?

Source: http://www.boredpanda.com/weird-toilet-paper-roll-art/

How about something a little less refined but just as fun for the kids? Make a circle or heart stamp for Valentines Day! Use the stamp to make cards and wrapping paper from newspapers!

Source: http://www.aprettycoollife.com/2012/02/weekly-pinterest_18.html
Source: http://www.parenthacks.com/2012/02/toilet-paper-roll-heart-stamps.html


Painting with toilet paper tubes
Source: http://creativecarmella.blogspot.com/2012/07/toilet-paper-roll-paintinga-diy-project.html

Christmas Poinsetta Wreath!
Source: http://www.darkroomanddearly.com/2012/12/10th-day-of-christmas-poinsettia-wreath.html
Another crafty option... Everybody loves owls!
Source: http://www.tonyastaab.com/

Just because...

Do you have any awesome ways of reusing paper rolls?
*Original sources are unknown for several of the above photos. If the above are yours, please let me know and I will gladly add credit where credit is due.*

Tuesday, January 29, 2013

How To: Make A Wishing Tree Vase


"A wish tree is an individual tree, usually distinguished by species, position or appearance, which is used as an object of wishes and offerings. Such trees are identified as possessing a special religious or spiritual value. By tradition, believers make votive offerings in order to gain from that nature spirit, saint or goddessfulfillment of a wish."
- Wikipedia


 I think the concept behind a wishing tree is really beautiful. Although this is not a post about wishing trees in their original uses, this simple and easy craft project is meant to emulate the symbolism of wishes as a really basic how-to make a wishing tree vase for sentimental and meaningful decorations at weddings, showers, and birthday parties.
 

We threw a baby shower for my friend and coworker, Kristie and I helped coordinate decorations. Kristie is having a little girl so we used pink, purple, and yellow.

 
 Wish trees are very easy to make and super affordable.This kind is basically a bouquet of twigs with notes attached and with a little bit of planning, it is practically free, but priceless in terms of sentimentality! I love things like that! This is proof that you don't need to spend an arm and a leg or be super extravagant  or extremely crafty to do something nice for someone.
How To: Make a Wishing Tree...

1. Simply gather branches, a vase, tags or note cards of some kind.
2. After your guests arrive they can write their well wishes for you and attach to the branches.
3. We used premade cardstock circles and mini clothes pin clips. You can also punch a hole and tie with string or purchase pre-made paper luggage tags.
4. Get creative! Come up with ideas for how to attach the wishes in a unique way that fits the theme of your event. Make it funky. Make it elegant. It is up to you!

Ours turned out beautifully and the best part was that at the end of the day Kristie had all these wonderful note to put in her daughter's baby book.

Would you make a wishing tree vase for your shower?

This post is dedicated to Kristie and little Jenna. Kristie recently brought home her little bundle of joy, Jenna. Congrats!
Subscribe to Saving With Selena